Karmada
资料
背景
- karmada是由华为开源的云原生多集群容器编排平台,在kubernetes Federation v1, v2(
kubefed)的基础上发展而来,吸取了其经验和教训,kubefed项目目前已经被放弃; - 其特点是在保存原有k8s资源定义API不变的情况下,通过添加与多云应用资源编排相关的一套新的API和控制面板组件,为用户提供多云/多集群容器部署,实现扩展、高可用等目标;
- 如下图所示为
kubefedv2接入vs时需要定义的CRD,因此接入kubefed是需要对原始k8s资源进行改造,对用户不友好:apiVersion: types.kubefed.io/v1beta1
kind: FederatedVirtualService
metadata:
name: service-route
namespace: default
spec:
placement:
clusters:
- name: cluster1
- name: cluster2
- name: cluster3
template:
metadata:
name: service-route
spec:
gateways:
- service-gateway
hosts:
- '*'
http:
- match:
- uri:
prefix: /
route:
- destination:
host: service-a-1
port:
number: 3000
部署
注意
- 跨集群的pod网络通信可以接入如
Submariner这种开源方案 - In order to prevent routing conflicts, Pod and Service CIDRs of clusters need non-overlapping
- 要开启multi-cluster service,需要安装
ServiceExport和ServiceImport
架构
架构
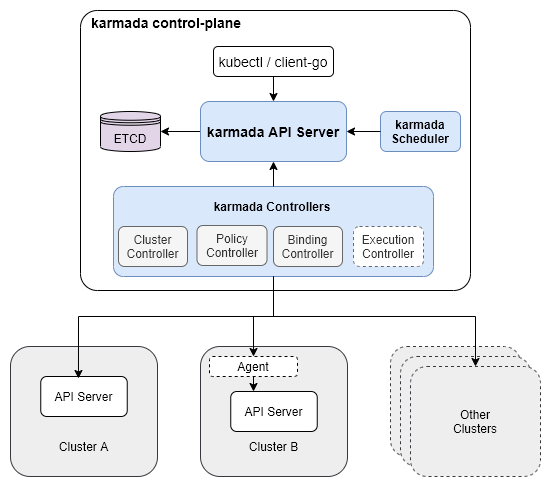
- 核心组件有:
karmada apiserver,karmada controller manager,karmada scheduler; karmada apiserver是在k8s apiserver的基础上开发的,所以功能与k8s apiserver类似;karmada scheduler是集群调度器,即完成在资源下发阶段,为资源选择合适集群的目标;karmada controller manager如下图所示,集成了4个controller:Cluster Controller将k8s集群连接到karmada,为每个集群都创建了一个Cluster资源对象,来管理集群的生命周期;Policy Controller监视PropagationPolicy对象,当该CRD创建时,controller会选择与resourceSelector匹配的一组资源,为每个单独的联邦资源对象创建ResourceBinding对象;Binding Controller监视ResourceBinding对象,为每个带有单个资源manifest的集群创建一个Work对象;Executioin Controller监视Work对象,当资源创建时,controller会把资源下发到成员集群中;
资源下发四个阶段
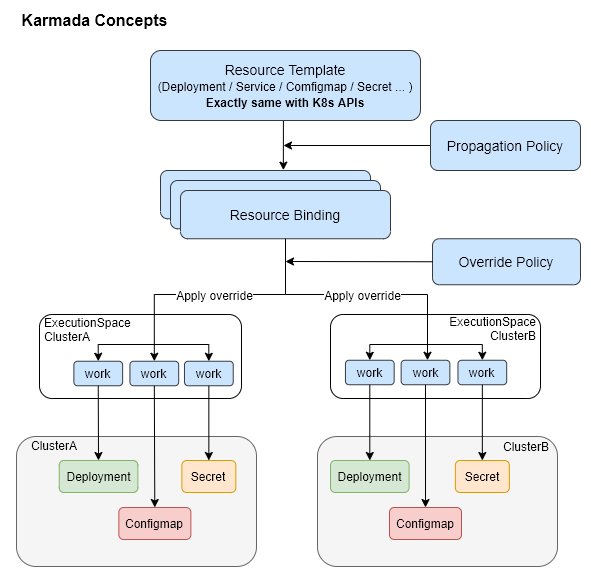
- karmada下的资源配置下发会经历4个阶段:
Resource Template->Propagation Policy->Resource Binding->Override Policy; Resource Template阶段:是定义资源模板,其可直接套用原生k8s的配置,无需进行改造;Propagation Policy阶段:为通过PropagationPolicy API来定义多集群的调度要求,CRD定义源码在这;- 支持1:N的策略映射机制,无需为每个联邦应用都标明调度约束;
- 使用默认策略的情况下,用户可以直接与k8s API交互;
Resource Binding阶段:此时应用会为每个联邦应用创建一个ResourceBinding资源,用于关联其PropagationPolicy资源,该CRD定义源码在这Override Policy阶段:为每个ResourceBinding资源执行集群级别的差异化配置改写,其CRD定义源码在这
组件特性
PropagationPolicy
重调度:karmada-descheduler and karmada-scheduler-estimator
karmada-descheduler
- 可根据成员集群内实例状态变化,主动触发重调度;
karmada-scheduler-estimator
- 为调度器提供更精确的成员集群运行实例的期望状态;
Karmada Install
环境准备
- 安装k8s;
- 如k8s主机是配置的域名,因karmada-controller需要通过该域名如
atms-00.vm访问目标集群,所以需要在karmada机器的coredns上配置如下IP映射:# kubectl edit cm -n kube-system coredns -o yaml
hosts {
10.13.149.88 atms-01.vm
10.13.148.34 atms-02.vm
fallthrough
}
install
安装cli:
curl -s https://raw.githubusercontent.com/karmada-io/karmada/master/hack/install-cli.sh | sudo INSTALL_CLI_VERSION=1.8.1 bash
curl -s https://raw.githubusercontent.com/karmada-io/karmada/master/hack/install-cli.sh | sudo INSTALL_CLI_VERSION=1.8.1 bash -s kubectl-karmada
初始化karmada
sudo kubectl karmada init --kubeconfig ~/.kube/config

#mkdir -p $HOME/.kube
sudo cp -i /etc/karmada/karmada-apiserver.config $HOME/.kube/karmada-apiserver.config
# sudo cp -i /etc/karmada/karmada-apiserver.config $HOME/.kube/karmada-apiserver.config
sudo chown $(id -u):$(id -g) $HOME/.kube/karmada-apiserver.config
Karmada有两个context:
karmada-apiserver和karmada-host,可通过kubectl config view查看所有集群:
karmada-apiserver
- 切换Context:
kubectl config use-context karmada-apiserver --kubeconfig ~/.kube/karmada-apiserver.config - 该Context是与Karmada控制面板交互时使用的主要
kubeconfig;
karmada-host
- 切换Context:
kubectl config use-context karmada-host --kubeconfig ~/.kube/karmada-apiserver.config - 该Context仅用于调试Karmada对
hostcluster的安装;
- join集群
# 先更改当前member集群的名
kubectl config rename-context kubernetes-admin@kubernetes atms-01

# register
kubectl karmada --kubeconfig ~/.kube/karmada-apiserver.config  join atms-01 --cluster-kubeconfig=$HOME/.kube/config

# check
kubectl get clusters --kubeconfig ~/.kube/karmada-apiserver.config - OK
uninstall
- 命令如下:
kubectl --kubeconfig /etc/karmada/karmada-apiserver.config get clusters
sudo rm -rf /var/lib/karmada-etcd
特性
- Karmada集群中,
Namespace资源是会被自动分发到集群成员中,这个功能是由Karmada-controller-manager组件中的namespacecontroller负责,可以通过配置Karmada控制器来进行配置,配置后,用户可以通过ClusterPropagationPolicy资源指定Namespace资源的分发策略;(参考)
Karmada直接操作pod
查询目标集群pod日志:
karmadactl --kubeconfig ~/.kube/karmada-apiserver.config -C atms-01 logs -f nginx-76d6c9b8c-th7qp
exec进目标集群pod容器:
karmadactl --kubeconfig ~/.kube/karmada-apiserver.config -C atms-01 exec -it nginx-76d6c9b8c-th7qp bash
Resource Propagating
https://karmada.io/zh/docs/userguide/scheduling/resource-propagating
Propagation API
- Karmada提供两种资源分发API:
PropagationPolicy和ClusterPropagationPolicy PropagationPolicy:只能作用于同一命名空间下资源的分发策略;ClusterPropagationPolicy:可以作用于所有命名空间下资源的分发策略;- 更新
PropagationPolicy的目标集群,会立刻对资源产生作用,如PropagationPolicy先将deployment分发到集群A,更新PropagationPolicy将deployment分发到集群B后,集群A的pod会被清理掉; - 删除
PropagationPolicy不会自动删除分发出去的资源;
Cluster Selector
LabelSelector
apiVersion: policy.karmada.io/v1alpha1
kind: PropagationPolicy
spec:
placement:
clusterAffinity:
labelSelector:
matchLabels:
location: us
apiVersion: policy.karmada.io/v1alpha1
kind: PropagationPolicy
spec:
placement:
clusterAffinity:
labelSelector:
matchExpressions:
- key: location
operator: In
values:
- usFieldSelector
spec:
  placement:
    clusterAffinity:
      fieldSelector:
        matchExpressions:
        - key: region
          operator: NotIn
          values:
          - cn-south-1
ClusterNames
spec:
  placement:
    clusterAffinity:
      clusterNames:
        - member1
        - member2
ExcludeClusters
spec:
  placement:
    clusterAffinity:
      exclude:
        - member1
        - member3
也支持基于污点的集群调度;
Replicas调度策略
.spec.placement.replicaScheduling字段代表了处理带有.replicas属性的资源如deployment,statefulsets,CRDs的副本分发策略;(CRDs可以通过自定义资源解释器来支持)
两种Replicas调度类型
作用于
.spec.placement.replicaScheduling.replicaSchedulingType
Duplicated:候选集群中副本数一样,如.replicas=3,则每个集群都是3个副本;Divided:候选集群中副本数一起划分,划分策略通过.spec.placement.replicaScheduling.replicaDivisionPreference字段来决定;
副本划分策略ReplicaDivisionPreference
仅在
.replicaSchedulingType: Divided时生效
Aggregated: 根据集群资源的情况,将尽可能少的副本数划分到集群中;Weighted: 根据WeightPreference策略,按比例划分副本数;
WeightPreference策略
StaticWeightList: 静态权重分配;DynamicWeight: 根据动态权重因子来动态决定副本数,当前支持的因子有:AvailableReplicas,即根据集群能运行的副本数量上限,按比例在集群间划分;
Propagation优先级
PropagationPolicy的优先级 >ClusterPropagationPolicy优先级;- 显式优先级:通过字段
.priority: 0来指定; - 隐式优先级:参考文档,根据集群筛选的selector类型,分三种优先级;
自定义资源解释器
https://github.com/karmada-io/karmada/tree/master/docs/proposals/resource-interpreter-webhook
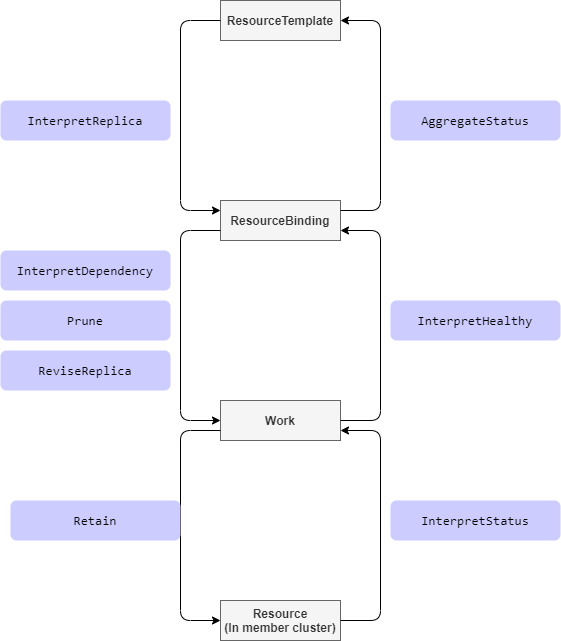
Interpret Ops
Retain的理解:
karmada控制面板会将资源状态同步到worker集群,而如果用户直接在worker集群修改了一些字段,如.replicas,则不会生效,因为还是会被karmada执行sync过程覆盖回去,如修改上述workload资源,改.replicas从2改为1,但过一会看,.replicas仍然还是2,而Retain机制,就是在karmada binding过程,让目标资源对象使用worker集群中的目标值,而不是karmada计算出来的值,这样就实现了资源值可由目标集群中的组件进行控制的目标;func (e *workloadInterpreter) responseWithExploreRetaining(desiredWorkload *workloadv1alpha1.Workload, req interpreter.Request) interpreter.Response {
if req.ObservedObject == nil {
err := fmt.Errorf("nil observedObject in exploreReview with operation type: %s", req.Operation)
return interpreter.Errored(http.StatusBadRequest, err)
}
observerWorkload := &workloadv1alpha1.Workload{}
err := e.decoder.DecodeRaw(*req.ObservedObject, observerWorkload)
if err != nil {
return interpreter.Errored(http.StatusBadRequest, err)
}
// Suppose we want to retain the `.spec.paused` field of the actual observed workload object in member cluster,
// and prevent from being overwritten by karmada controller-plane.
wantedWorkload := desiredWorkload.DeepCopy()
wantedWorkload.Spec.Paused = observerWorkload.Spec.Paused
marshaledBytes, err := json.Marshal(wantedWorkload)
if err != nil {
return interpreter.Errored(http.StatusInternalServerError, err)
}
return interpreter.PatchResponseFromRaw(req.Object.Raw, marshaledBytes)ReviseReplica机制:
就是允许karmada修改CRD中的.replicas属性
Demo
https://github.com/karmada-io/karmada/tree/master/examples/customresourceinterpreter
- interpreter webhook的实现可以直接在yaml
ResourceInterpreterWebhookConfiguration中用lua脚本实现,也可以通过Go语言实现(参考:examples/customresourceinterpreter/webhook/app/webhook.go)
- 进入
karmada项目目录,生成部署目录:mkdir deploy; - 执行步骤
# 创建CRD
kkm apply -f examples/customresourceinterpreter/apis/workload.example.io_workloads.yaml - 分发CRD,命令:
kkm apply -f deploy/workload-crd-cpp.yaml# workload-crd-cpp.yaml
apiVersion: policy.karmada.io/v1alpha1
kind: ClusterPropagationPolicy
metadata:
name: workload-crd-cpp
spec:
resourceSelectors:
- apiVersion: apiextensions.k8s.io/v1
kind: CustomResourceDefinition
name: workloads.workload.example.io
placement:
clusterAffinity:
clusterNames:
- atms-01
- member1 - 在worker集群验证CRD:
kubectl get crds | grep workloads - 创建webhook服务:
# 1. 编辑配置
cp examples/customresourceinterpreter/karmada-interpreter-webhook-example.yaml deploy/karmada-interpreter-webhook-example.yaml
vim deploy/karmada-interpreter-webhook-example.yaml
#    修改其Service的`.spec.type: ClusterIP`

# 2. 创建资源
# 注意:这里是在host k8s上创建
kubectl apply -f deploy/karmada-interpreter-webhook-example.yaml - 创建
ResourceInterpreterWebhookConfiguration# 准备karmada根证书,用于与karmada-apiserver通信
export ca_string=$(cat /etc/karmada/pki/ca.crt | base64 | tr "\n" " "|sed s/[[:space:]]//g)
# 更新deploy/webhook-configuration.yaml配置
# 这里的target host直接使用上面创建的service: `karmada-interpreter-webhook-example.karmada-system.svc`
# 证书已经支持了改域名:*.karmada-system.svc
sed -i'' -e "s/{{caBundle}}/${ca_string}/g" -e "s/{{karmada-interpreter-webhook-example-svc-address}}/karmada-interpreter-webhook-example.karmada-system.svc/g" "deploy/webhook-configuration.yaml"
# 创建与验证
kkm apply -f deploy/webhook-configuration.yaml
kkm get resourceinterpreterwebhookconfiguration examples - 准备CRD
Workload的分发策略配置:# vim deploy/workload-propagationpolicy.yaml
apiVersion: policy.karmada.io/v1alpha1
kind: PropagationPolicy
metadata:
name: nginx-workload-propagation
spec:
resourceSelectors:
- apiVersion: workload.example.io/v1alpha1
kind: Workload
name: nginx
placement:
clusterAffinity:
clusterNames:
- atms-01
- member1
replicaScheduling:
replicaDivisionPreference: Weighted
replicaSchedulingType: Divided
weightPreference:
staticWeightList:
- targetCluster:
clusterNames:
- atms-01
weight: 2
- targetCluster:
clusterNames:
- member1
weight: 1 - 创建
Workload的分发策略配置:kkm apply -f deploy/workload-propagationpolicy.yaml - 因默认karmada webhook secret没有创建,这里创建出来:
# artifacts/deploy/deploy-karmada.sh
export CERT_DIR="/etc/karmada/pki"
KARMADA_CRT=$(base64 < "${CERT_DIR}/karmada.crt" | tr -d '\r\n')
KARMADA_KEY=$(base64 < "${CERT_DIR}/karmada.key" | tr -d '\r\n')

cp artifacts/deploy/karmada-webhook-cert-secret.yaml deploy/
sed -i'' -e "s/{{server_key}}/${KARMADA_KEY}/g" deploy/karmada-webhook-cert-secret.yaml
sed -i'' -e "s/{{server_certificate}}/${KARMADA_CRT}/g" deploy/karmada-webhook-cert-secret.yaml

kubectl apply -f deploy/karmada-webhook-cert-secret.yaml
kubectl get secret -n karmada-system - 如karmada-host k8s的
karmada-system下没有kubeconfigsecret(默认是创建了的),则通过如下命令创建:# 下面的secret默认已经存在于host k8s上,不用创建
cp artifacts/deploy/secret.yaml deploy/
ROOT_CA_FILE=${CERT_DIR}/ca.crt
ROOT_CA_KEY=${CERT_DIR}/ca.key
KARMADA_CRT=$(base64 < "${CERT_DIR}/karmada.crt" | tr -d '\r\n')
KARMADA_KEY=$(base64 < "${CERT_DIR}/karmada.key" | tr -d '\r\n')
sed -i'' -e "s/{{client_crt}}/${KARMADA_CRT}/g" deploy/secret.yaml
sed -i'' -e "s/{{client_key}}/${KARMADA_KEY}/g" deploy/secret.yaml
kubectl apply -f deploy/secret.yaml - 等待webhook deployment起来,可以去karmada-host主机上查看:
wps@atms-01:~/karmada$ kubectl get pod -n karmada-system | grep karmada-interpreter-
karmada-interpreter-webhook-example-5b4c6c455b-hrh9g 1/1 Running 0 66m - 接下来就是部署测试用例,并校验效果:
kkm apply -f deploy/workload-interpret-test.yaml
kkm get workload nginx -o yaml  # 查看status
kkm get rb  nginx-workload -o yaml  # 查看binding状态